- Reduced price
- 5%

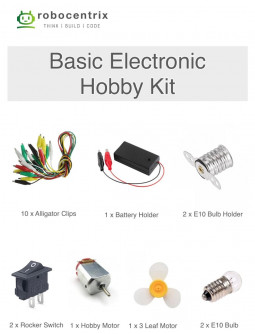

This project kit is designed to introduce beginners to basic electronics and mechanical principles through hands-on experiments. It includes essential components for building simple circuits and understanding the fundamentals of electricity, motors, and switches. The kit is perfect for educational purposes, helping students develop foundational knowledge in electronics, physics, and DIY projects. 4 basic projects included.
This project kit is designed to introduce beginners to basic electronics and mechanical principles through hands-on experiments. It includes essential components for building simple circuits and understanding the fundamentals of electricity, motors, and switches. The kit is perfect for educational purposes, helping students develop foundational knowledge in electronics, physics, and DIY projects.
• 2-Slot AA Battery Holder with On/Off Switch and Alligator Clip: Provides a simple power supply with an easy on/off control for low-voltage circuits. Includes alligator clips for quick and secure connections.
• E10 Bulb 1.5V 0.3A: Standard E10 light bulbs perfect for simple circuit demonstrations and experiments with light.
• E10 Nickel Plated Bulb Holder Type A: Durable holders for E10 bulbs that allow easy installation into circuits.
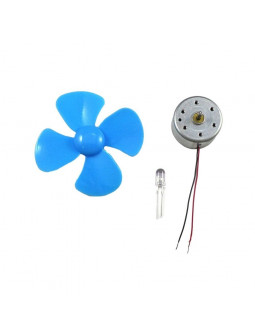
• DC Hobby Motor - Type 130: A small DC motor ideal for basic motor-driven projects such as fans, car models, or mechanical toys.
• Three Leaf Fan for DC Motors: A plastic fan blade that can be attached to the DC motor to demonstrate mechanical motion and air movement.
• Alligator Clips: A set of alligator clips for quick, reliable, and reusable electrical connections in circuits.
• Rocker Switch - 2PIN 3A/250V: A robust switch for controlling the flow of electricity in your circuits, handling up to 250V at 3A.
Objective: Build a basic on/off light circuit using the battery holder, rocker switch, E10 bulbs, and alligator clips.
Materials Needed:
• 2-Slot AA Battery Holder with On/Off Switch and Alligator Clips
• Rocker Switch - 2PIN 3A/250V
• 2 x E10 Bulb 1.5V 0.3A
• 2 x E10 Nickel Plated Bulb Holder Type A
• 10 Pack Alligator Clips
Steps:
1. Set Up the Power Source:
• Insert two AA batteries into the 2-slot battery holder.
• Make sure the built-in on/off switch is in the "off" position for now.
2. Connect the Bulb Holder:
• Attach an alligator clip from the positive (red) wire of the battery holder to one terminal of the first E10 bulb holder.
• Securely screw an E10 bulb into the bulb holder.
3. Integrate the Rocker Switch:
• Connect another alligator clip from the second terminal of the E10 bulb holder to one pin of the rocker switch.
• Use another alligator clip to connect the second pin of the rocker switch to the negative (black) wire of the battery holder.
4. Test the Circuit:
• Flip the on/off switch on the battery holder to "on."
• Now, toggle the rocker switch to complete the circuit. The bulb should light up when the rocker switch is in the "on" position and turn off when switched off.
5. Expand the Circuit (Optional):
• To add another bulb in parallel, repeat the above steps for the second E10 bulb and bulb holder. Connect both circuits to the same battery holder.
Objective: Create a simple electric fan using the DC motor, fan blade, and battery holder.
Materials Needed:
• 2-Slot AA Battery Holder with On/Off Switch and Alligator Clips
• 1 x DC Hobby Motor - Type 130
• 1 x Three Leaf Fan for DC Motors
• 10 Pack Alligator Clips
Steps:
1. Set Up the Power Source:
• Insert two AA batteries into the 2-slot battery holder.
• Make sure the on/off switch is in the "off" position.
2. Attach the Fan Blade:
• Gently press the three-leaf fan blade onto the shaft of the DC motor. Ensure it is securely attached.
3. Connect the Motor:
• Attach the positive (red) wire of the battery holder to one terminal of the DC motor using an alligator clip.
• Connect the negative (black) wire of the battery holder to the other terminal of the motor using another alligator clip.
3. Test the Fan:
• Flip the switch on the battery holder to the "on" position. The fan should begin to spin, demonstrating how the motor converts electrical energy into mechanical motion.
5. Adjust Fan Speed (Optional):
• You can experiment with different power sources or varying the number of batteries to change the speed of the fan.
Objective: Explore the differences between series and parallel circuits using the bulbs and alligator clips.
Materials Needed:
• 2-Slot AA Battery Holder with On/Off Switch and Alligator Clips
• 2 x E10 Bulb 1.5V 0.3A
• 2 x E10 Nickel Plated Bulb Holder Type A
• 10 Pack Alligator Clips
Steps:
1. Series Circuit Setup:
• Attach the positive (red) wire from the battery holder to the first terminal of the first bulb holder.
• Connect the second terminal of the first bulb holder to the first terminal of the second bulb holder using an alligator clip.
• Finally, connect the second terminal of the second bulb holder to the negative (black) wire of the battery holder.
2. Test the Series Circuit:
• Flip the switch on the battery holder. Both bulbs should light up, but they will share the voltage and may be dimmer than a single bulb.
3. Parallel Circuit Setup:
• Connect the positive (red) wire from the battery holder to one terminal of both bulb holders using alligator clips.
• Connect the negative (black) wire from the battery holder to the remaining terminals of both bulb holders.
4. Test the Parallel Circuit:
• Flip the switch on the battery holder. Both bulbs should light up with full brightness, as each bulb is receiving the full voltage independently.
Objective: Build a simple motorized toy or windmill using the DC motor, fan blade, and battery holder.
Materials Needed:
• 2-Slot AA Battery Holder with On/Off Switch and Alligator Clips
• 1 x DC Hobby Motor - Type 130
• 1 x Three Leaf Fan for DC Motors
• 10 Pack Alligator Clips
• Simple Toy Body or Windmill Structure (optional materials like cardboard or plastic)
Steps:
1. Build the Toy Structure:
• Create a simple toy body or windmill structure using cardboard, plastic, or any other materials you have on hand. Ensure that the motor can be securely attached.
2. Attach the Fan Blade:
• Press the three-leaf fan onto the shaft of the DC motor.
3. Connect the Motor:
• Attach the positive (red) wire from the battery holder to one terminal of the DC motor using an alligator clip.
• Connect the negative (black) wire from the battery holder to the other terminal of the motor using another alligator clip.
4. Test the Toy/Windmill:
• Flip the switch on the battery holder. The fan should spin, driving your toy or windmill mechanism.
5. Customize the Toy (Optional):
• Add decorations, paint, or other features to personalize your toy or windmill. Experiment with different speeds and power sources.
1. 2-Slot AA Battery Holder:
• Voltage: 3V (2 x 1.5V AA batteries)
• Includes: On/Off switch, attached alligator clips for easy connections
2. E10 Bulbs:
• Voltage: 1.5V
• Current: 0.3A
• Base Type: E10 screw base
3. E10 Bulb Holders:
• Material: Nickel-plated metal
• Compatible with E10 bulbs
4. DC Hobby Motor - Type 130:
• Operating Voltage: 1.5V - 3V
• Current: Approx. 0.35A
• Speed: Varies depending on voltage (up to 10,000 RPM)
5. Three Leaf Fan for DC Motors:
• Diameter: Approx. 50mm
• Material: Plastic
• Compatible with Type 130 DC motor
6. Alligator Clips:
• Quantity: 10
• Insulated handles for safety
7. Rocker Switch - 2PIN:
• Rating: 3A/250V
• Pin Count: 2
• Type: On/Off switch
• 1 X 2-Slot AA Battery Holder with On/Off Switch and Alligator Clip
• 2 X E10 Bulb 1.5V 0.3A
• 2 X E10 Nickel Plated Bulb Holder Type A
• 1 X DC Hobby Motor - Type 130
• 1 X Three Leaf Fan for DC Motors
• 10 x Alligator Clips
• 2 X Rocker Switch - 2PIN 3A/250V

This project kit is designed to introduce beginners to basic electronics and mechanical principles through hands-on experiments. It includes essential components for building simple circuits and understanding the fundamentals of electricity, motors, and switches. The kit is perfect for educational purposes, helping students develop foundational knowledge in electronics, physics, and DIY projects. 4 basic projects included.