Coming Soon: Kiddiengineer Module 1a: Introduction to Coding with the BBC micro:bit
R 485.00
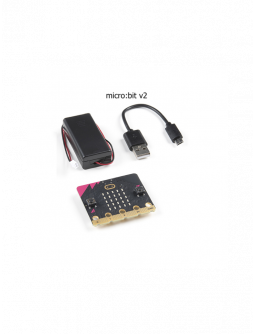
Learn how to use your BBC micro:bit (delivered anywhere in South Africa) an award-winning programmable microcontroller that allows students to get hands-on with coding and digital making. You will learn how to code using the Makecode block editor, to code and program the BBC micro:bit and create awesome projects.


Learn how to use your BBC micro:bit (delivered anywhere in South Africa) an award-winning programmable microcontroller that allows students to get hands-on with coding and digital making. You will learn how to code using the Makecode block editor, to code and program the BBC micro:bit and create awesome projects.
How it works?
- Decide which course you would like to do; we recommend starting with 1a and working your way up through the courses. All the micro:bit courses will use the BBC micro:bit
- Purchase your training course on the RoboFactory website
- The email registered with RoboFactory will be used as your email for the course
- Robofactory will deliver the hardware associated with that course if hardware is purchased. If no hardware is purchased, please send an email to [email protected] to receive a unique voucher code that will remove the cost of delivery.
- Within 24 hours you will receive a welcome email with your user credentials to log into the course from Kiddiengineer on the after-school.co.za platform.
- Once you receive login credentials, you will have access to the course for 4 months.
1. Introduction to Module 1a
1. Lesson 1 - Overview
2. Lesson 1 - The Editor Overview
3. What is Computational Thinking
4. What is engineering?
5. What is coding?
6. What does a computer do?
7. Why we use a micro:bit
8. Inputs and outputs
9. Accessing Makecode
10. What is blockly?
11. The Makecode Editor
12. Project 1: Beating Heart
13. P1: Beating Heart Solution - Solution video.
14. Saving a .hex file
1. Lesson 2 - Overview
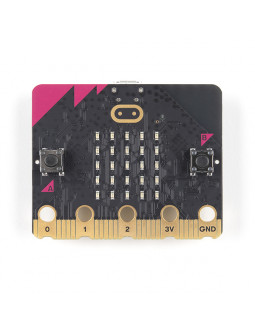
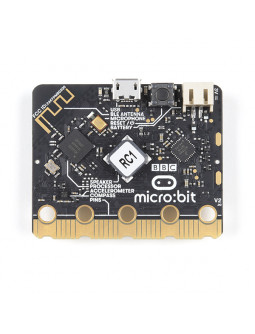
2. Introduction to the micro:bit
3. Pepper Greeting
4. The BBC micro:bit processor
5. Meeting your micro:bit - version 1
6. Meeting your micro:bit - version 2
7. Safety Briefing
8. Powering your micro:bit for the first time - version 1
9. Powering your micro:bit for the first time - version 2
10. Importing a saved program or URL into Makecode
11. Project 2: Importing a URL
12. P2: Importing a URL - Solution video.
13. Transferring or Flashing your .hex file
14. Drag and Drop Flashing on a PC
15. Drag and Drop Flashing on a Mac
16. Drag and Drop Flashing on a Chromebook
17. Drag and Drop Flashing on a Linux
18. Direct Transfer from you pc to your micro:bit
19. Flashing from a tablet or cellphone
20. Flashing from a tablet or cellphone (android)
21. Inputs 1
22. Inputs 2
23. Project 3: Using inputs with icons
24. P3: Using inputs with icons - Solution video.
25. Project 4: Creating a message
26. P4: Creating a Message - Solution video.
27. Project 5: Creating a Timer
28. P5: Timer - Solution video.
1. Lesson 3 - Overview
2. Introduction to LED's
3. Pixels vs. LED's
4. Project 6: Creating pictures on your micro:bit.
5. P6: Creating pictures on your micro:bit - Solution video.
6. Parameters
7. Project 7: Creating animation
8. P7: Creating Animation - Solution Video
9. Unplot
10. Project 8: Use Plot & unplot to see how many numbers you can make.
11. P8: Use Plot & unplot to see how many numbers you can make - Solution Video
12. Tutorial
13. Saving & Downloading
1. Lesson 4 - Overview
2. Introduction to variables
3. Making a variable
4. Project 9: Make your first variable
5. P9: Make your first variable - Solution Video
6. Changing a variables value
7. Dice game
8. Project 10: Making an accurate dice
9. P10: Making an accurate dice - Solution Video
10. Mathematics Calculator
11. Project 11 : Making other maths calculators
12. P11 : Making other maths calculators - Solution Video
13. Pedometer - Intro part 1
14. Pedometer - Intro part 2
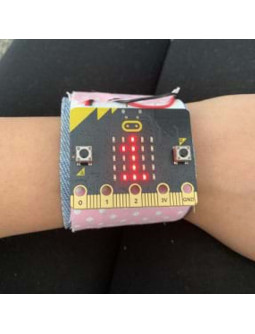
15. Project 12: Creating a wearable for your pedometer
1. Lesson 5 - Overview
2. Scoreboard introduction
3. Basic Counter
4. Project 13: Up and down Counter
5. P13: Up and Down counter - Solution Video
6. Project 14: Rugby Counter
7. P14: Rugby counter - Solution Video
8. Project 15: Counting both score and games
9. P15: Counting both score and games - Solution video
Objectives
- By the end of this module you will be able to use Makecode and its simulator.
- By the end of this module you will be able to connect a micro:bit to your device (pc, tablet or phone) and flash code to your micro:bit.
- By the end of this module you would have covered the basics of the block library.
- By the end of this module you will be able to create programs and use them on your micro:bit, and continue to use your micro:bit whilst not connected to a device.
Requirements
- No previous knowledge is required.
- You do not necessarily need a BBC micro:bit, but you will learn a lot more if you do.
- You will need a device to connect to the internet.
- You will be shown how to get the correct FREE apps for your device.
- This course is recommended for individuals 10 years of age and up.
Certification
- You will receive a certificate of completion for Kiddiengineer Module 1a: Introduction to Coding with micro:bit

About afterschool.co.za
At after-school.co.za we empower teachers and students, looking to find teacher training or extramural activities that can be done online, in the comfort of their own homes, on any device and in their own time.
Interested and need more information ?
Contact: [email protected] | 011 068 6699
833
Specific References
You might also like

Learn how to use your BBC micro:bit (delivered anywhere in South Africa) an award-winning programmable microcontroller that allows students to get hands-on with coding and digital making. You will learn how to code using the Makecode block editor, to code and program the BBC micro:bit and create awesome projects.